Signs of Woodworm in Attic Roof Timbers and What They Mean
11 November 2026
Share

Recognising the Signs of Woodworm in Attic Timbers
The main signs of woodworm in attic timbers are small round exit holes of 1 to 2 mm in rafters, purlins and joists, fine pale bore dust (frass) on or below the timber, and wood that feels soft or crumbles at the surface. Fresh, clean holes and new dust usually point to an active infestation that needs treatment.
Below we explain what each sign looks like in roof timbers, how to tell old damage from active woodworm, where to look first, what to avoid doing and how we inspect and treat attics in Dublin and the surrounding counties.
Why Roof Timbers Attract Woodworm
Most woodworm we find in roof timbers is caused by the common furniture beetle, Anobium punctatum, which readily attacks structural softwood, and the timbers of an attic suit it well. Rafters, purlins, ceiling joists and attic floor joists are often softwood with a band of sapwood along the edges, and sapwood is what the larvae prefer to eat.
Moisture matters too. Beetle larvae develop best in timber that stays slightly damp, so attics with poor ventilation, a slipped slate, a leaking valley or condensation around the eaves are more at risk. Many older houses also have timber that has been in place for decades without any preservative treatment, which gives an infestation years to build up unnoticed.
Because few people go into the attic more than once or twice a year, woodworm in roof timbers often goes undetected for a long time. By the time someone spots holes while storing boxes or fitting insulation, the larvae may have been feeding inside the wood for several years.
What Woodworm in Roof Timbers Looks Like
When you go into the attic with a good torch, these are the signs to look for on the rafters, purlins and joists.
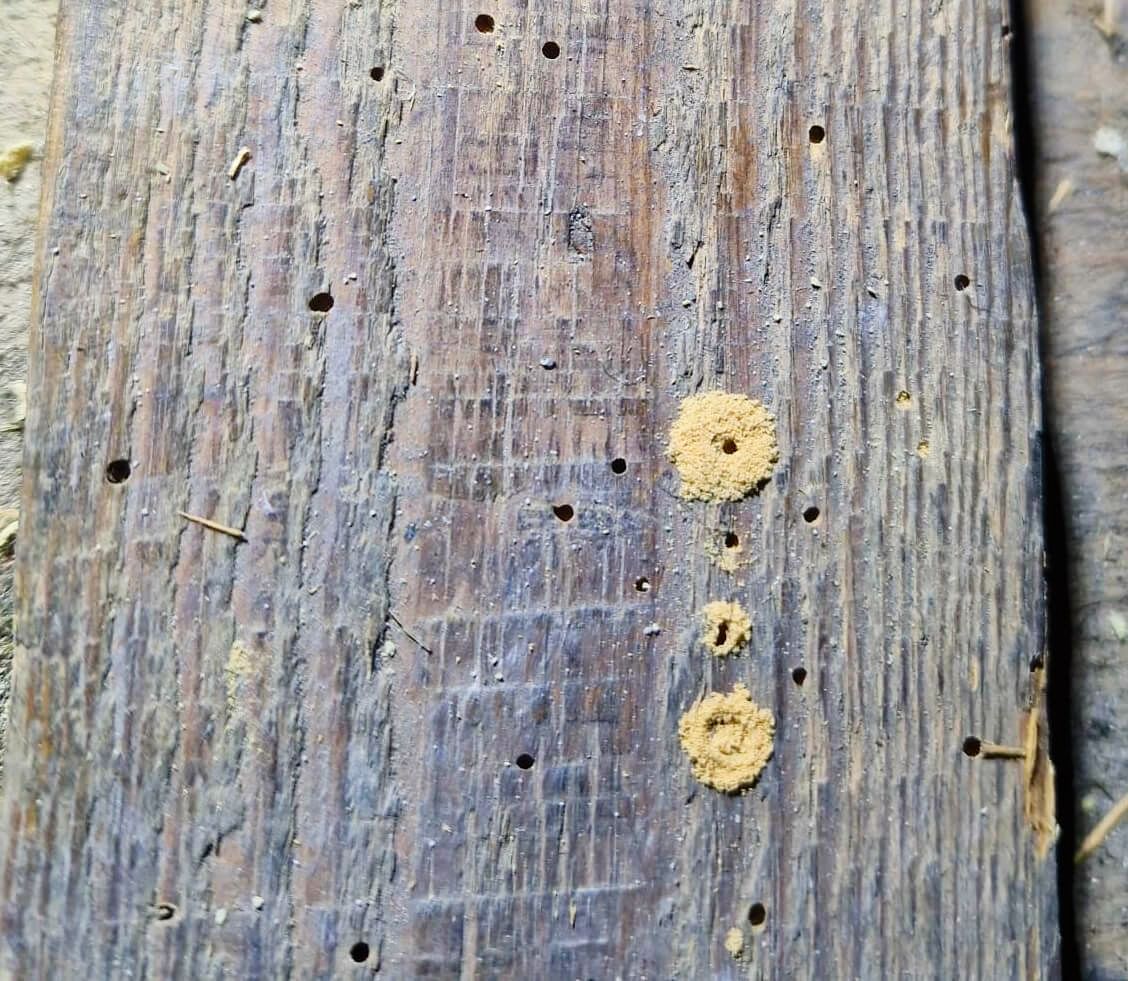
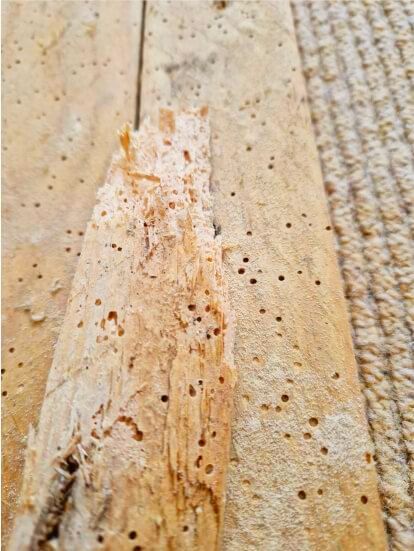
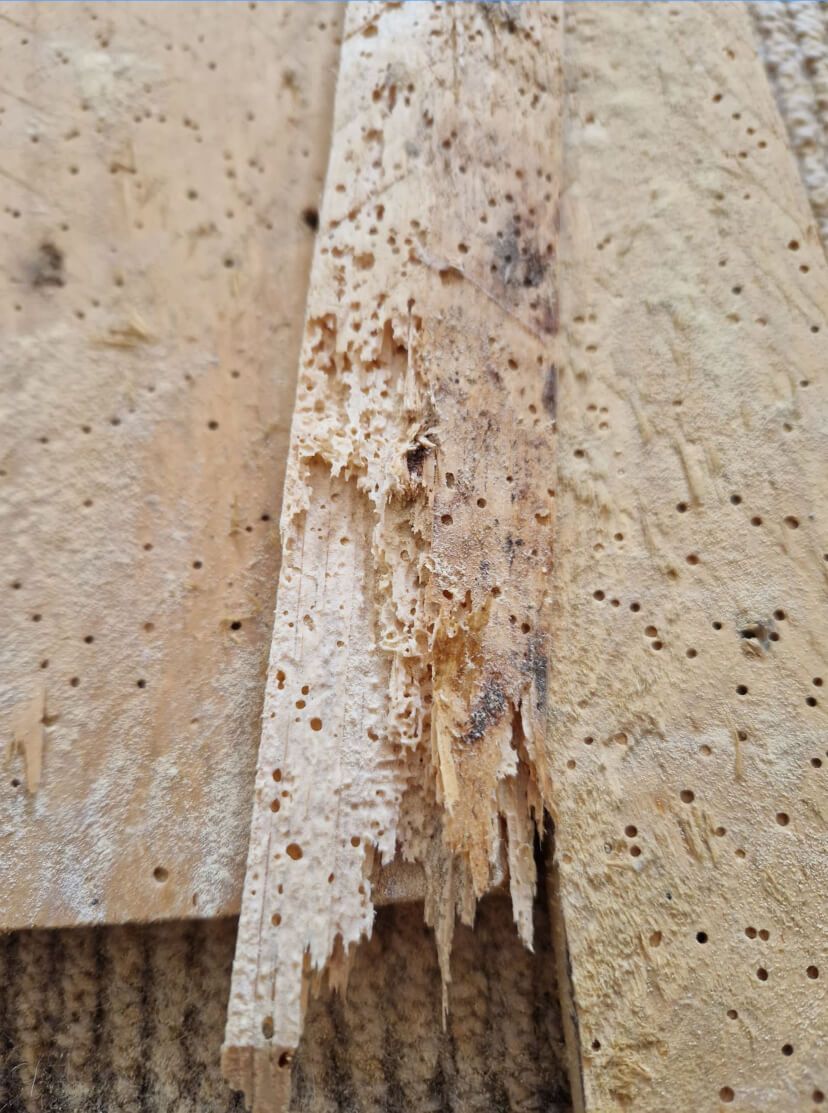
- Exit holes. Small, round holes about 1 to 2 mm across, scattered over the timber surface. These are made by adult beetles leaving the wood, not by larvae going in.
- Bore dust (frass). Fine, gritty, pale powder on the timber, gathered in small piles on joists or lying on the ceiling side of the attic floor below an affected rafter.
- Crumbling edges. Corners and edges of timbers that break away easily when pressed with a screwdriver, often showing a honeycomb of tunnels underneath.
- Tunnels under the surface. Where timber has been damaged, you may see the galleries left by larvae running along the grain.
- Dead beetles. Small brown beetles, around 3 to 5 mm long, on the attic floor, on insulation or near the attic window or hatch, especially in late spring and summer.
A few holes on their own do not always mean the problem is current, but any combination of these signs in roof timbers is worth having checked by a specialist.
Telling active woodworm from old damage
Old, inactive holes tend to have dark, weathered edges the same colour as the surrounding wood, and any dust around them is grey or mixed with general attic dirt. Active woodworm shows clean, sharp holes with light-coloured wood inside, and fresh bore dust that looks bright and settles in neat little cones. If you clean a section of timber and new dust or holes appear over the following months, the infestation is live. We describe a simple way of testing this in our article on how to check for active woodworm.
Where to Look First in a Loft
Woodworm rarely spreads evenly across a roof. It tends to concentrate where timber is softer or damper, so a methodical check of a few areas gives a good picture of what is going on.
- Start at the eaves, where rafters meet the wall plate. This is where condensation and leaks often show first.
- Check the lower edges of the rafters and the faces of the purlins, as these catch the light and show holes clearly.
- Look along the ceiling joists and attic floor joists, especially under stored items and around the hatch.
- Inspect any timber near chimneys, valleys, water tanks and roof windows, where moisture can collect.
- Move insulation back carefully where it is safe to do so, as the tops of joists are often hidden under it.
Take photographs of anything you find, with a coin or ruler beside the holes for scale. Photos make it easier for us to give an accurate idea of the work over the phone. Only step on joists or boarded areas, never on the plasterboard ceiling between them.
Mistakes to Avoid With Woodworm in an Attic
When people find woodworm in their roof timbers, a few common mistakes can make the problem worse or more costly to fix later.
- Ignoring a small patch. A seemingly small infestation in one rafter can spread to neighbouring timbers over the following beetle seasons.
- Brushing a surface product onto visible areas only. Larvae live deep inside the wood, and a light surface coat may not reach them or the hidden faces of the timber.
- Leaving the cause in place. If damp from a leak or poor ventilation is not dealt with, the timber stays attractive to beetles.
- Assuming every hole means weakened timber. Many attics have old, inactive damage that is not structural, and only a proper inspection can tell the difference.
How We Inspect and Treat Woodworm in Roof Timbers
When we inspect an attic, we check each run of rafters, purlins and joists for exit holes, fresh bore dust and soft or crumbling timber, and we probe affected areas to judge how deep the damage goes. We also note signs of damp or poor ventilation that may have encouraged the beetles, so the cause can be addressed alongside the treatment.
Where the signs of woodworm in attic timbers show an active infestation, we use one of the best water-based high-pressure woodworm treatment systems currently available. The high-pressure application drives the treatment into the timber surfaces and holes, reaching the areas where larvae feed rather than just coating the outside. We take care to keep you, your family and pets safe while we work and to finish the job as quickly as possible. You can read more about the process on our woodworm treatment page and our page on professional woodworm treatment.
Preparing the attic for treatment
Before we arrive, it helps to clear stored boxes and belongings from the attic so that all the roof timbers can be reached. Make sure the hatch is accessible and there is space on the landing below. If the attic has a lot of insulation over the joists, let us know when you call so we can plan the work. For an idea of what affects the price of a job, see our guide to woodworm treatment costs.
When to Call a Woodworm Specialist
Call a specialist if you see fresh bore dust, clean new holes, crumbling timber edges or dead beetles in the attic, or if you are buying or selling a house and a survey has flagged woodworm in the roof. Acting early keeps treatment simpler and helps prevent further structural damage to the roof. Our treatment is guaranteed, giving you a long-term solution rather than a short-term fix.
In short, the clearest signs of woodworm in attic timbers are small round exit holes, fresh pale bore dust and soft, crumbling timber in the rafters, purlins and joists. If you notice any of these in your roof space anywhere in Dublin or the surrounding counties, an inspection will confirm whether the woodworm is active and what treatment the timbers need.
For a free estimate over the phone, contact OnGuard Pest Control. Call us on 01 503 7787 or email info@onguardpestcontrol.ie, and with a few short questions we can give you a quote.
Recent Posts


Recognising the Signs of Woodworm in Attic Timbers
The main signs of woodworm in attic timbers are small round exit holes of 1 to 2 mm in rafters, purlins and joists, fine pale bore dust (frass) on or below the timber, and wood that feels soft or crumbles at the surface. Fresh, clean holes and new dust usually point to an active infestation that needs treatment.
Below we explain what each sign looks like in roof timbers, how to tell old damage from active woodworm, where to look first, what to avoid doing and how we inspect and treat attics in Dublin and the surrounding counties.
Why Roof Timbers Attract Woodworm
Most woodworm we find in roof timbers is caused by the common furniture beetle, Anobium punctatum, which readily attacks structural softwood, and the timbers of an attic suit it well. Rafters, purlins, ceiling joists and attic floor joists are often softwood with a band of sapwood along the edges, and sapwood is what the larvae prefer to eat.
Moisture matters too. Beetle larvae develop best in timber that stays slightly damp, so attics with poor ventilation, a slipped slate, a leaking valley or condensation around the eaves are more at risk. Many older houses also have timber that has been in place for decades without any preservative treatment, which gives an infestation years to build up unnoticed.
Because few people go into the attic more than once or twice a year, woodworm in roof timbers often goes undetected for a long time. By the time someone spots holes while storing boxes or fitting insulation, the larvae may have been feeding inside the wood for several years.
What Woodworm in Roof Timbers Looks Like
When you go into the attic with a good torch, these are the signs to look for on the rafters, purlins and joists.
- Exit holes. Small, round holes about 1 to 2 mm across, scattered over the timber surface. These are made by adult beetles leaving the wood, not by larvae going in.
- Bore dust (frass). Fine, gritty, pale powder on the timber, gathered in small piles on joists or lying on the ceiling side of the attic floor below an affected rafter.
- Crumbling edges. Corners and edges of timbers that break away easily when pressed with a screwdriver, often showing a honeycomb of tunnels underneath.
- Tunnels under the surface. Where timber has been damaged, you may see the galleries left by larvae running along the grain.
- Dead beetles. Small brown beetles, around 3 to 5 mm long, on the attic floor, on insulation or near the attic window or hatch, especially in late spring and summer.
A few holes on their own do not always mean the problem is current, but any combination of these signs in roof timbers is worth having checked by a specialist.
Telling active woodworm from old damage
Old, inactive holes tend to have dark, weathered edges the same colour as the surrounding wood, and any dust around them is grey or mixed with general attic dirt. Active woodworm shows clean, sharp holes with light-coloured wood inside, and fresh bore dust that looks bright and settles in neat little cones. If you clean a section of timber and new dust or holes appear over the following months, the infestation is live. We describe a simple way of testing this in our article on how to check for active woodworm.
Where to Look First in a Loft
Woodworm rarely spreads evenly across a roof. It tends to concentrate where timber is softer or damper, so a methodical check of a few areas gives a good picture of what is going on.
- Start at the eaves, where rafters meet the wall plate. This is where condensation and leaks often show first.
- Check the lower edges of the rafters and the faces of the purlins, as these catch the light and show holes clearly.
- Look along the ceiling joists and attic floor joists, especially under stored items and around the hatch.
- Inspect any timber near chimneys, valleys, water tanks and roof windows, where moisture can collect.
- Move insulation back carefully where it is safe to do so, as the tops of joists are often hidden under it.
Take photographs of anything you find, with a coin or ruler beside the holes for scale. Photos make it easier for us to give an accurate idea of the work over the phone. Only step on joists or boarded areas, never on the plasterboard ceiling between them.
Mistakes to Avoid With Woodworm in an Attic
When people find woodworm in their roof timbers, a few common mistakes can make the problem worse or more costly to fix later.
- Ignoring a small patch. A seemingly small infestation in one rafter can spread to neighbouring timbers over the following beetle seasons.
- Brushing a surface product onto visible areas only. Larvae live deep inside the wood, and a light surface coat may not reach them or the hidden faces of the timber.
- Leaving the cause in place. If damp from a leak or poor ventilation is not dealt with, the timber stays attractive to beetles.
- Assuming every hole means weakened timber. Many attics have old, inactive damage that is not structural, and only a proper inspection can tell the difference.
How We Inspect and Treat Woodworm in Roof Timbers
When we inspect an attic, we check each run of rafters, purlins and joists for exit holes, fresh bore dust and soft or crumbling timber, and we probe affected areas to judge how deep the damage goes. We also note signs of damp or poor ventilation that may have encouraged the beetles, so the cause can be addressed alongside the treatment.
Where the signs of woodworm in attic timbers show an active infestation, we use one of the best water-based high-pressure woodworm treatment systems currently available. The high-pressure application drives the treatment into the timber surfaces and holes, reaching the areas where larvae feed rather than just coating the outside. We take care to keep you, your family and pets safe while we work and to finish the job as quickly as possible. You can read more about the process on our woodworm treatment page and our page on professional woodworm treatment.
Preparing the attic for treatment
Before we arrive, it helps to clear stored boxes and belongings from the attic so that all the roof timbers can be reached. Make sure the hatch is accessible and there is space on the landing below. If the attic has a lot of insulation over the joists, let us know when you call so we can plan the work. For an idea of what affects the price of a job, see our guide to woodworm treatment costs.
When to Call a Woodworm Specialist
Call a specialist if you see fresh bore dust, clean new holes, crumbling timber edges or dead beetles in the attic, or if you are buying or selling a house and a survey has flagged woodworm in the roof. Acting early keeps treatment simpler and helps prevent further structural damage to the roof. Our treatment is guaranteed, giving you a long-term solution rather than a short-term fix.
In short, the clearest signs of woodworm in attic timbers are small round exit holes, fresh pale bore dust and soft, crumbling timber in the rafters, purlins and joists. If you notice any of these in your roof space anywhere in Dublin or the surrounding counties, an inspection will confirm whether the woodworm is active and what treatment the timbers need.
For a free estimate over the phone, contact OnGuard Pest Control. Call us on 01 503 7787 or email info@onguardpestcontrol.ie, and with a few short questions we can give you a quote.